Tuesday, December 25, 2012
Season's Greetings
Happy Holidays to everyone. May 2013 bring you and your loved ones good health, lots of love and happiness and good fortune.
Tuesday, December 11, 2012
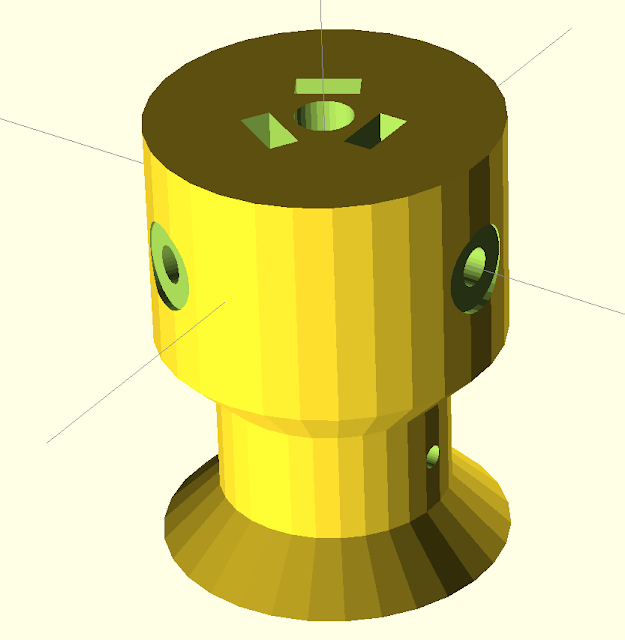
Giveaway 1 - Parametric pulley & idler
Pulley and matching Idler for string driven Rostock Style 3D Printer
Download at: http://www.thingiverse.com/thing:36951
(Enjoy printing. Feedback is welcome)
- STL and SCAD (parametric) format
- Both pulley and idler are preset for M3 nuts
- Parameters are isolated in a separate file
- The ODS file contains some calculations to help you with the parameters and the calculation of the string lenght
Download at: http://www.thingiverse.com/thing:36951
(Enjoy printing. Feedback is welcome)
Friday, December 7, 2012
Drawing parts (1 / many)
Pending the arrival of the last parts, I decided to start designing some modifications I plan to incorporate in my printer.
First things first though. So activities of yesterday's and today's evenings were:
First things first though. So activities of yesterday's and today's evenings were:
- Install OpenSCAD 3D modeling software which seems to be the favorite amongst the freeware loving builders/makers community.
- Learn the OpenSCAD scripting/programming language. Luckily it comes with the decent manual and there are quite some interesting lessons on Youtube.
- Design a first thing to get a feel of OpenSCAD. I chose to design a 'parameterized' new version of a pulley for a string driven Rostock (preset for M3 nuts and bolts). Came out quite well,... I hope (can't print it yet, so I hope to get some feedback from my readers or from people downloading it from Thingiverse.
- Post the pulley on Thingiverse for everybody to use www.thingiverse.com/thing:36951

Monday, December 3, 2012
Build Status Update (part 8/many) - Platform moves!
Just a quick update. After finishing the assembly of the frame and the linear motion, I could finally install and test the platform. Turns out the steppers missed some steps every now and then, but the platform moved. Goal for the day achieved. Next step is taking care of the 'misstepping steppers'.
Below a short video (if there's no pic, it didn't happen).
Below a short video (if there's no pic, it didn't happen).
Wednesday, November 28, 2012
Build Status Update (part 7/many) - First moves!
Just a quick update with a short movie. Today I finished the linear motion. I still some tuning to do though.
As expected I had to fiddle a bit as I am using Spectra instead of belts and replaced the pulleys and idlers with custom printed ones (well to be honest, I got them from Thingiverse). As it turns out the pulleys I had printed are not exactly the right size (scotch tape can do miracles in times of emergency; still not something to keep). Nevertheless job for the day done!
Note to myself: "design your own pulleys and idlers")
Airprinting a Rostock Platform
Tuesday, November 27, 2012
Build Status Update (part 6/many) - First moves!
Today my printed parts (red abs) and the rods arrived; so time to start assembling my very own Rostock Delta style 3D printer.
Goal for the day was one moving 'leg', and moving... it did albeit for a very short time!
Before the first attempt, I had to fiddle a bit with the Marlin script though (reversing polarity of the motors). Question to myself: time to make a fork or ask Johann for some enhancements in the standard version?
But as I said, it moved... and it stuttered. But still it moved. By stuttering I mean the top idler was misaligned with the filament pulley, so the spectra 'derailed' but hey; goal of the day reached!
Below is a little video of the very first move. It's an unedited version, so you will also see the filament loosening at the end (Maybe I should have made a 'director's cut').
Thursday, November 22, 2012
Parts arrived! (part 5/7)
Today the Spectra braided line arrived. It came nicely packages via air mail all the way from China. Unlike most others working on Rostock or Kossel type 3D printers I didn't go for the heavy duty type of line with a 0.6mm diameter and capable of pulling a car. I settled for the 0.2mm sized braided line which should be able to pull 20LB (9,0718474 Kg). After all, the weight of all moving parts combined is just a few hundred grams. We'll see how the line behaves once my very own Rostock type 3D printer is moving. By the way, the line is red as my printed parts will be.
Still on their way:
Still on their way:
- Rods (expected during or juster after the weekend)
- Plastic parts - red (expected during or juster after the weekend)
- PTFE tube (just ordered today; should arrive in 4-5 days)
Wednesday, November 21, 2012
Build Status Update (part 5/many) - 'Crazy' motor problem solved
The electronics part is finished! Yesterday, I solved the 'crazy' motor issue. So now I can print air as the whole thing is not assembled yet and is still laid out my desk.
To be honest I got some help on solving the 'crazy motor' issue. It turned out I hadn't defined the bed center in Slic3r to match a Rostock Delta type 3D printer. The correct setting for a Rostock is 0x0 instead of the default 100x100 which is ok for Mendel, Prusa and the like. Combining 100x100 with a Rostock results in negative square root calculations and in the 'crazy motor syndrom'.
Now it's just waiting for the the plastic parts, rods and braided line to arrive. In the meantime I will prepare all parts for the frame.
Still looking for a good PTFE supplier for my bowden setup though.
Tuesday, November 20, 2012
Build Status Update (part 4/many) - Hot end connected
This evening I connected the J-Head MK Vb. It involved some fiddling with the tiny connectors to make the double connection at the Sanguinololu end (see here for the wiring diagram), but I managed. The temperature is showing in Pronterface for Mac and the hot end gets really hot. So, one more thing to tick off on the todo list and sofar for the good news.
As for the motor that goes crazy (x-motor position; first connector from the left) after starting a 'dummy print', no progress is made so far. Hoping to isolate a faulty wiring or Pololu, I first switched the X and Y motors positions with no result. I also switched the Pololus without a positive result. The motor connected on the leftmost Pololu still acts bizarre.
The only thing left for now is to go back to the original firmware (standard Marlin) that was preloaded when I received the Sanguinololu and see what happens.
If the 'crazy motors' insists on spinning until I reset the printer in Pronterface, the board must be faulty; if not there might be an issue with the 'Rostock modified Marlin'. Hope to have some good news soon.
Monday, November 19, 2012
Build Status Update (part 3/many) - Firmware uploaded
I finally managed to upload Johann's modified Marlin firmware from my iMac onto the Sanguinololu (Atmega 1284P). Apparently the Johann-Marlin/Sanguinololu/iMac combo is not that wide spread yet. So it took me a while to find all the required info, but with some great help from Roland - who emailed me some very useful tips tips - I finally managed.
All the electrical/electronic parts are now connected and laid out on my desk, and I can 'virtually' print stuff using Johann's firmware.
One strange observation though: after 'homing' (I have to click the end stops manually as there is no real printer yet), and starting to 'print', the X-motor keeps spinning and there is no way, except resetting the printer in Pronterface, to stop it. Strange things indeed... but just another hurdle to take.
Friday, November 16, 2012
Parts arrived! (part 4/7)
Today it's nuts, bolts and washers day. What can I say? They arrived, ... that's about it.
What's still missing?
What's still missing?
- Rods
- Plastic parts
- PTFE tube (still looking for a supplier that anything than by the meter
Build Status Update (part 2/many) - It's moving!
It's moving! This evening I connected all the electronic and electrical stuff, apart from the J-head MK 5b hot end, to do a first test of the components, ... and I could 'virtually print' something. First test passed: all the stuff involved seems to work, even the salvaged ATX power supply I ripped out of an old PC (took me while though).
Next challenge: the 'brains' of what is supposed to become my derivative of a Rostock style Delta RepRap 3D printer will be a Sanguinololu. The board came preloaded with standard Marlin software (allowing me to do the initial component tests), so I need to upload the 'Rostock Marlin' version. As the Sanguinololu is hooked up to a Mac, it seems I might be in for a long search as how to do the uploading. There seems to be no such thing as a standard step by step tutorial to follow. I will post my findings as soon as I am able to do the upload and have some documentation on the process.
Hope it won't take too long before my next update.
Wednesday, November 14, 2012
Build Status Update (part 1/many)
Just ripped apart a old desktop I have laying around gathering dust to salvage the 300W power supply (should be enough for testing).
As I am not an electrical engineer, it took me a while to get any juice out of it though, but the info on this page helped me out (connecting the green wire to ground did miracles.
I also got the "Rostock modified" Marlin ready to be transferred to the Sanguinololu.
Nopheads film will be my little tutorial on how to attach those little connectors to the motor and end stop wires. Once this is done, I can start uploading Marlin and testing.
Keep following...
Tuesday, November 13, 2012
Parts arrived! (part 3/7)
Ordered on the 8th, arrived today in Belgium!
Parts arrived
Parts arrived
- 1 MR105ZZ 5x10x4 ball bearing
Monday, November 12, 2012
Parts arrived! (part 2/7)
Ordered on the 8th, arrived today in Belgium!
Parts arrived:
Parts arrived:
- 1 Sanguinololu (incl Pololu's) (UK)
- 1 J-Head MK Vb (UK)
- 1 MK7 Gear (DK)
- Carbon tubes 6mm (BE)
Friday, November 9, 2012
Parts arrived! (part 1/7)
Ordered in The Netherlands on the 8th, arrived today in Belgium!
Parts arrived:
Parts arrived:
- 4 Nema 17 Stepper motors
- 6 LM8UU Linear bearings
- 3 608ZZ bearings
Waiting for parts to arrive
Quick update as it's been a while. I just ordered most of the parts I need for my first Rostock 3D printer derivative.
A few hick-ups though. The guy who previously agreed to print the plastic - ABS - parts and deliver the rods, just informed me - after I emailed him my 'order' - that he 'just' raised his price with a little over 20%. I think he really expected me to order the parts anyway. To be clear about this: I am not; a quote is a quote in my book.
So I am looking for someone else in the area to print the required Rostock parts and I also need to find a new supplier for the rods (hope it doesn't take too long to find somebody).
I also need to find a PTFE (bowden tube) supplier that doesn't charge a shipping fee that exceeds the product cost tenfold.
Once this is finished, the wait for the parts can start and after that it's up to the fun part.
I'll keep you guys updated on my search for the suppliers of the last parts and maybe post some pics as soon as parts start to arrive.
Happy fabbing!
Wednesday, October 17, 2012
BOM Finished; Sourcing Finished; Ready to order
A quick update. I just finished the 'standard' aka 'Johann's' Rostock 3D printer BOM and I believe I located the cheapest (small volume) suppliers around (all but two, European to save on shipping costs).
This means it is now time to start ordering all the parts for my "Generation 1" 3D Printer. I consider the first one as a 'Generation 1' because once it is build and performing well, it will just serve to print the parts of my own Rostock derivative I have in mind (Gen 2, etc).
As parts come in, it will be quiet on this blog, unless something goes wrong that's worthwhile sharing.
Keep checking in for the build process.
Tuesday, October 2, 2012
Rostock Build: Status Update
As I mentioned before, it takes one to make one. So, the first thing to do is build one.
As I intend to develop an iteration on the Rostock type 3D printer, I decided to start by building one just to 1) have a printer to print the parts I will need in the future to develop my own iteration and 2) to get some experience along the way.
As of now I am finalizing the sourcing process for my initial Bill of Materials (BOM) and am just waiting for some shipping cost information.
I decided to build kind of a mix of Johann's Rostock (the original Delta Type 3D Printer) and Bill's variation of it (neither published a complete BOM; so there is some 'guestimating' involved.
Once I get the last information on shipping costs (I am sourcing all over the planet; so watching shipping costs is quite important), I will start ordering the parts and keep you guys and girls posted on the progress. So check in regularly for some news on the Rostock/Bill and spread the news.
Monday, October 1, 2012
Nice example of the real future of 3D printing
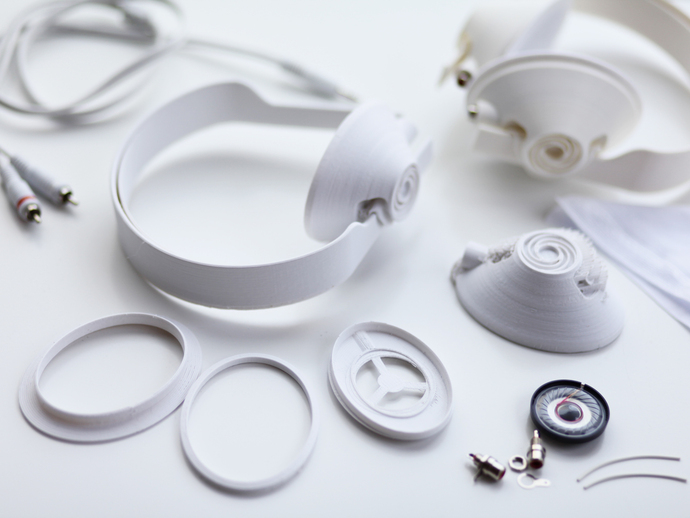
It seems 3D printing is evolving from "nice thingies for geeks(*)" to real usefull objects.
(*) As I am kind of a geek myself, I hope you don't blame me for using this phrasing.
This seems a very good example of what I mean: Printable Headphones by jmabry http://www.thingiverse.com/

(*) As I am kind of a geek myself, I hope you don't blame me for using this phrasing.
This seems a very good example of what I mean: Printable Headphones by jmabry http://www.thingiverse.com/
Wednesday, September 26, 2012
Friday, September 21, 2012
It takes one, to make one
In RepRap, the "Rep" stands for Replicating. Kind of obvious for those acquainted with Dr Bowyer's pioneering work and its derivatives. For all the others: enjoy reading the hundreds if not thousands of pages here if you want to get to know "all there is to know about Reprapping, but were afraid to ask".
In short, it means it takes a 3D printer to make (part of) a 3D printer.
As I set out on a journey to design and build a Delta style 3D printer, and as I don't have a 3D printer right now, I will have to start by building one in order to make my own design come to life (kind of chicken and egg story).
Here are my options: buying a 3D printer; buying a kit (most if not all of them Darwin or Mendel based); Repstrapping a printer or buying all the parts required to build a 3D printer of my liking.
Let's go over my options and see what comes out .
- Buying a 3D printer: just too easy and I would not learn anything about 3D printing and the obstacles it takes.
- Buying a kit: all kits available - that I am aware of (please send me a message in case I missed something) - are either Darwin or Mendel based. As I intend to go for a delta type printer and not for a carthesian one, I would not learn anything in the process if I would use a carthesian type of 3D printer.
- Repstrapping means building any kind of 3D printer - whether it be Carthesien or delta type - requires having parts laying around that one can use. As I am more of a theoretical kind of guy, I don't have that many stuff lying around in my shed to get me even started repstrapping a 3D printer; which brings me to option Nr 4.
- Building a 3D printer of my liking. As I plan to design and build a delta type 3D printer (also know as a Rostock in the RepRap community and still in prototype phase), I decided to start by building a standard Rostock as Johann initially designed it and use that Rostock to print the parts I need to build my own type of delta type 3D printer. I just might learn a thing or two, ... or more, in the process; or at least I hope so.
So as we speak, I am completing my BOM (Bill of Material) based on the Johann's partial BOM, some information I found on the net and on some ... guessing.
Check future posts for the rest of my journey and (hopefully a complete Rostock BOM).
Sunday, September 16, 2012
Rostock it is,... with some modifications
With the ever growing interest in home 3D printing and the pioneering work of Dr Adrian Bowyer and the numerous (sometimes commercial) derivatives, modifications and add-ons developed by hundreds of fabbers, modders and tinkerers (see thingiverse to get an idea), the Mendel based 3D printers are all based on a very mature design by now. Recent developments in 'multi-extruder' printing and color-mixing are the talk of the town with some promising developments.
All this is reason enough to consider walking a less beaten path. Enter Rostock (delta robot 3D printing). Johann did some fine pioneering work here, but, as he states himself, Rostock is still a prototype for now. This makes it all the more interesting to me to actively participate in the further development of the Rostock type of home 3D printers. So, the choice is made. Let the journey begin!
Steps to take:
- Brainstorm & design
- Bill Of Materials
- Buy parts
- Build
- Back to 1 till satisfied.
Keep you all posted!
Thursday, September 13, 2012
To Mendel or to Rostock? That's the question...
Since Dr Adrian Bowyer started with the whole 3D printing RepRap story, a lot of derivatives of his first self-replicating 3D printer (Darwin) and its more popular iteration (Mendel) have been developed by an ever growing RepRap community of tinkerers/makers.
However, a new 3D printing project started last year by Johann may add some new blood to the gene pool. Johann developed the Rostock printer.
Where the 'classical' RepRaps are all cartesian 3D printing robots (x, y & z axis), Johann went for the Delta-type 3D printing robot.
All this makes me question which path to follow; hence the title "To Mendel or to Rostock? That's the question". Let me work a bit on this one; I'll be back (soon?).
 |
| Darwin |
| Mendel |
 |
| Rostock |
Wednesday, September 5, 2012
YaRRp - Where does the name come from?
Actually this should have been my first post to make as the name YaRRp may not be so clear to everybody.
YaRRp stands for Yet Another RepRap Project. Why you might ask? As the whole '3D printing at home' phenomenon is based on the RepRap project (Replicating Rapid-prototyper) of Professor Adrian Bowyer of Bath University who came up with the first self-replicating machine (see picture), it is only just to refer to his early work; hence the name YaRRp.
P.S. For those of you who jumped to the RepRap link and started reading: it's an awful lot of material (mechanics, electronics, programming, ...) to digest.
That's why I set out to simplify assembly, easy of calibration and ease of use of 3D printing without losing capability and without giving in on the fun of making physical things on your desk or in your shed.
 |
| Adrian Bowyer's and his team's first self-replicating 3D printer Newton |
Tuesday, September 4, 2012
Just finished reading everything there is to read about 3D Printing... NOT
| RepRap Logo |
One thing I learned though, is that there is quite some room - or should I say 'need' - for improvement here and there in order to make 3D printing accesible for what one could call 'The Masses' (actually I mean you and me and every other non 'techie').
OK, so I found my challenge: design an affordable 'Home 3D printer' - adhering to the RepRap priciples - that is fit for use by 'non-techies', hobbyists, tinkerers, makers, students, artists, etc.
I my next post, I will list the design goals. By the way, some commonly available 3D printers for the end-user market - either as a kit or fully assembled - are Mendel, Mende Prusa, Makerbot, etc.
P.S. Any suggestions for requirements are more than welcome.
Subscribe to:
Posts (Atom)